Whatever the season and road conditions, having properly pressurized tires is an essential part of a safe, smooth ride in your vehicle. Luckily, it’s easy to check tire pressure at home, and by following these step-by-step instructions you can do it yourself! And if you do find your tire pressure is off, then never fear: a quick trip to your local Kia dealer to fill your tires back up to the correct pressure is all you need. Read on for our easy guide on checking your tire pressure at home.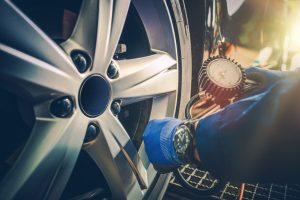
1. Get a Tire Pressure Gauge (If You Don’t Already Have One)
The first step to being able to check your own tire pressure is to get a tire pressure gauge! This is a small tool that will allow you to accurately read how pressurized your tires are. You can pick these up at any gas station or auto parts store.
2. Find Out What the Recommended Tire Pressure Is for Your Vehicle
Next, you’ll want to know what number you should be looking for when measuring your tire pressure! To find out what your vehicle’s recommended tire pressure is, you can look at the sticker on the inside of the driver’s side door. Usually, a vehicle’s recommended tire pressure is written here, measured in psi (pounds per square inch).
If you can’t find the recommended tire pressure written down on this sticker, you can also find it on your vehicle’s manual, or by searching online!
3. Wait Until Your Tires Have “Cooled Down”
You should check your tire pressure when the tires are “cool,” and not right after driving, which heats them up and affects the reading. Wait a few hours after driving to check your tire pressure for an accurate reading.
4. Remove the Cap from the Air Valve
Next, remove the cap from the air valve on the tire you want to check. Make sure you store this somewhere safe, so you don’t lose it!
5. Use and Read Your Tire Pressure Gauge
Take your tire pressure gauge and push it into the now-uncapped air valve on the tire you are checking. It’s normal to hear a hiss of air when you first do this, but you should push the gauge in tight enough that this hissing stops! Your tire pressure gauge should now show you (either digitally or via a moving measuring stick at the bottom, depending on the type of gauge) what your tire pressure is. Note this number and remove the gauge from the air valve.
6. Compare Your Reading to the Recommended Tire Pressure
Now, compare your reading to what is recommended. If your reading is higher than recommended, your tires are overinflated. If your reading is lower, they are underinflated and may need some more air.
7. Repeat for Each Tire
Simply repeat these steps for each of your vehicle’s tires!
Get Tires Serviced in Lanham, MD Today
That’s all there is to it! If you’ve followed these steps and noticed that your vehicle’s tire pressure isn’t at the recommended level, just come on down and visit us at DARCARS Lanham Kia and our team of trusted mechanics will have your tires back in perfectly-pressurized shape in no time!
Connect with us


Recent Blog Entries
- Understanding the Trim Levels of the 2025 Kia K4: Compact Sedan Customized
- Kia Certified Technicians: Quality Service You Can Trust
- Four Favorite Features of the 2025 Kia Niro Plug-in Hybrid
- 4 Impressive Aspects of the 2025 Kia Carnival
- Your Guide to the Kia Maintenance Schedule: Keep Your Vehicle Running Strong
Categories
 Warranties include 10-year/100,000-mile powertrain and 5-year/60,000-mile basic. All warranties and roadside assistance are limited. See retailer for warranty details.